Just add gravel
How to turn a sunny spot into an attractive hassle-free garden to enjoy all year long. Words & Photos Mark Rayner.
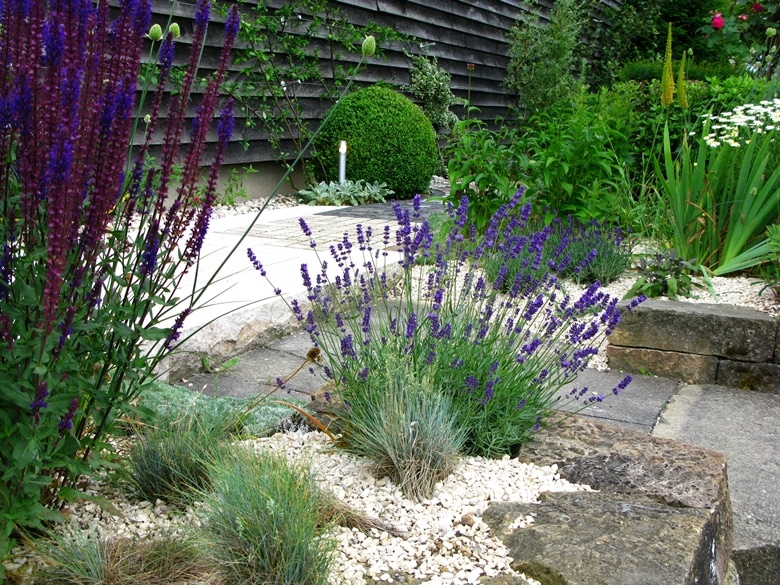
If you’re looking for a simple and inexpensive way to transform a sunny spot into a low-maintenance area of permanent and hassle-free planting, you might want to consider turning it into a gravel garden. With minimal preparation and ongoing care, this style of garden has long been favoured by those who want an attractive year-round outdoor area without the usual ongoing chores of weeding, feeding and watering. Once established, this garden will (almost) take care of itself.
How do they work?
Gravel gardens work on the principle that a thick layer of gravel (at least 10cm) covering an area of well-drained (or even dry) ground will suppress most weeds and at the same time provide ideal growing conditions for a wide variety of drought-tolerant plants. This thick stone mulch helps to conserve moisture in the soil (so there’s no need to water), and if you choose robust plants (those that need no additional nutrients than what’s in the existing soil), then there’s no need to fertilise either.
First up
Begin with a clear site, removing any existing weeds and other unwanted plants. If you have the time, an effective and bio-friendly technique for clearing any area of ground is simply to lay black plastic over the soil for several months. The complete lack of light will put a halt to any photosynthesis happening in the weeds beneath, resulting in their demise.
Once you have your ground prepared, ensure there is something edging the entire area to contain the gravel – this could be the edges of existing raised beds or fences, or purpose-built edging made from treated timber, stones, brick or other suitable reclaimed materials. The gravel will be at a depth of approximately 10cm, so the edging needs to be at least this height.
Feel free at this stage to improve the soil in the areas where you intend to plant as this will be the last chance you have to enrich the soil before the gravel goes down. Digging in some well-rotted compost or suitable animal manure is the most effective way to give your plants a bit of a boost – and to also keep the worms happy.


Now plan your layout
Now is the time for the preliminary laying out of your plants and any potential paving that may traverse the gravel. This needs to both look and feel right – walk across the paving stones to ensure they are comfortably spaced and check the eventual height and spread of plants to be certain they are in the right spot.
Once satisfied with the layout, plant the larger plants directly into the soil – leaving the potted root ball of each protruding approximately 5–8cm above the ground level (this will be covered by gravel shortly). Remove the smaller plants to another area, keeping note of where you want to place them. Next, to provide a biodegradable permeable barrier between the soil and gravel, cover the entire area of ground with a decent layer of cardboard or newspaper, tucking it well under the edges of paving stones and running it hard up to the retaining edges and the plants you’ve just put in. For a more permanent barrier, you might prefer to use weed mat.
Add the gravel
Proceed by covering the entire area with your chosen gravel, placing it around any pavers and carefully pushing it right up to the base of the larger plants. Roughly level it with an outdoor broom or rake, and then place your smaller plants into position.
For these smaller plants, you need to create a ‘pocket’ of growing medium in the gravel. Using a small trowel, carefully scoop out some gravel until you get down to the newspaper or cardboard below, and then cut a small hole in this with a sharp knife. Put a little potting mix in the base of the hole and place the plant on top of this. Sprinkle a little more potting mix around the sides of the plant and cover this back up with the gravel.
Once all the smaller plants are in, have one final sweep of the gravel to ensure that it’s flat and off any pavers, and then place a few larger stones into position throughout the garden as accent points.
Ongoing maintenance
The garden will need to be well watered until the plants have established themselves into the soil beneath the gravel (especially if you’re doing this in the warmer months). Once fully settled in, they should need little (if any) additional watering.
The inevitable few weeds will appear over time, although these are most likely to come from airborne seed so can easily be plucked from the gravel as they emerge. Deadhead and tidy any plants as necessary (taking care to remove any clippings from the gravel) and keep the whole area clear of any other wind-borne garden debris, such as fallen leaves.
Other ideas
- Add interest by using smaller areas of contrasting gravel or even other types of decorative mulch, such as crushed shells.
- Gravel gardens work best on areas of relatively flat ground. If yours is on a sloping site, consider a series of gravel terraces instead.
- Use a piece of sculptural garden art – or a large rock – to create a focal point within your gravel garden.
3 steps to your gravel garden
Choose your:

ball of each protruding approximately 5–8cm above the ground level.
- Site
Gravel gardens work best in areas of full sun as deep shade will limit your plant choice and can even result in discoloration of the gravel from mould.
Position the garden away from deciduous and fruiting trees to avoid major autumn clean-ups, and be aware that areas of gravel directly adjacent to an entrance to the house may result in the gravel tracking inside. - Gravel
Grey pea metal is the cheapest option for gravelled areas – it also compacts well, feeling firm to walk on, and its soft grey colour associates well with surrounding plants. The downside is that the small stones can get stuck on footwear and track inside.
Larger-grade stones can also be used, though they tend not to feel so comfortable underfoot.
White lime chip is another popular choice, although it’s more expensive and can create a glare in large areas of full sun. - Plants
Your plants will need to thrive in full sun and be drought-tolerant (unless you want to water regularly), and it’s best that the majority are evergreen to provide year-round interest.
You may want to include a few perennials for some seasonal change, but be aware that these may need to be cut back in winter.
Avoid overly messy plants that may drop fruit or berries (or an excess of flower petals), and ensure plants are a suitable size for their allocated spot.
Gravel garden favourites
- All types of lavender
- Smaller ornamental grasses
- A collection of sun-loving succulents
- Drought-tolerant herbs, such as rosemary, thyme and curry plant (Helichrysum italicum)
Subscribe here to get future Kiwi Gardener issues delivered to your door.